Apologies for the clickbaity headline! Since MMORPG Tycoon 2 was greenlit about a month ago, I’ve been finding myself giving Greenlight advice to a lot of people who are struggling. And rather than typing out that same advice over and over again every couple days, I figured I’d put the advice here, so I can just link people to it. If you’re interested in the process, read on!
(Spoiler: there actually isn’t “one weird trick”. Just a bunch of potentially useful basic marketing techniques and strategies.)
I’ve divided this up by time. Please feel free to jump ahead to later sections, depending upon where you are in the Greenlight process!
Prep work
![]() Your first decision to make is when to launch on Greenlight. Popular wisdom is that you want to launch when your main audience is awake and likely to be at a computer, so they’ll hopefully be caught by your first wave of marketing. I’m in Australia, and my largest audience is in the USA, so I chose to launch early in the morning here, which is about lunchtime in much of the USA.
Your first decision to make is when to launch on Greenlight. Popular wisdom is that you want to launch when your main audience is awake and likely to be at a computer, so they’ll hopefully be caught by your first wave of marketing. I’m in Australia, and my largest audience is in the USA, so I chose to launch early in the morning here, which is about lunchtime in much of the USA.
In terms of day of the week, Steam pushes people to you for approximately the first two days that you’re on Steam, so you want to pick a “first day” such that you’ll get a lot of people during those two days. This means you probably don’t want to launch on a Friday, since one of the days would be a weekend, and lots of the audience goes away on the weekends. In my case, I launched on a Thursday (local time), which was fine. I feel like later in the week is better, but I don’t have any data to support that.
In terms of when in the year, the same rules apply. You’re better off not launching during any major holidays, as a lot of your audience is likely to be away from their computers during those two free days where Steam pushes traffic to you. In my case, I realised that I wasn’t going to hit my original ‘Early November’ date, and so had to delay all the way to March/April, in order to avoid launching during Winter/Summer holidays in the territories I was focusing on. You’re not actually selling your game, so you don’t need to worry about avoiding other major game releases, or game sales, but overlapping with holidays is best avoided.
The trailer
A greenlight trailer isn’t a game trailer. I can’t stress this enough. A Greenlight trailer is just a teaser. You’re not actually trying to get people to open their wallets and actually give you their cash; you’re only trying to intrigue them enough to click on the little ‘yes’ button, which costs them nothing.
The number one thing to understand about Greenlight is that most of the people who are browsing submissions are only lightly engaged. They’re browsing, and looking for something that leaps out at them and shakes them by their shoulders, yelling “Look at me, I’m awesome!” This is very different from someone who visits your store page, who is actually thinking about perhaps spending money on something. The person on the store page is saying “Demonstrate why you’re worth my money”, and wants details, whereas the person on the Greenlight page is just saying “Do something to make me excited.”
All the best advice says that your Greenlight trailer should be short. Ideally, only about 45 seconds long. Most Greenlight trailers, including MMORPG Tycoon 2’s, are about a minute long. Any more than a minute, though, and you lose control of the viewer; they’ll see how long the video is going to be when it starts playing, and if it’s much over a minute they’re likely to start skipping around, or will simply disengage. And if they’re skipping around, you’re not in control of what they see. Which is totally not what you want, when you’re trying to coax them into loving your game enough to click on that ‘Yes’ button!
And since you’re trying to catch people’s attention, your trailer needs to have some pace to it, to hold the viewers. Each individual shot should be no longer than about 3 seconds, unless it’s for a specific reason. In the case of MMORPG Tycoon 2’s trailer, I have one early shot that lasts for 6 seconds. It’s intentional; it’s a backward dolly of the camera, revealing more and more subscribers as it goes. This one shot continues so long because it’s trying to provoke the viewer into a “This shot has to end now, right? There can’t be still more people, can there?” reaction. It’s the massive crowd of characters that sells the whole game concept, and so I wanted to push that shot absolutely as hard as I could.
But other than that single shot, each of the other shots in the trailer last just a couple seconds, and then moves on. Slow pacing, dreamlike soundscapes, and long shots are all fine for full game trailers, but that’s not what we’re about here in Greenlight. Here it’s go fast, or go home. This is because the majority of your viewers aren’t actually interested in you; they’ve just been dumped on your page randomly, and they don’t care about your studio or your game’s intricate world or your innovative thematic statements; they just want to be entertained, and they want to be entertained now. And so you have to entertain them immediately, right from the start of the trailer, or you’re likely to lose them.
A more detailed description of how your game actually works can go in the description, for viewers who care. But that almost doesn’t matter; the vast majority of greenlight voters vote entirely based upon the trailer, and often based solely on the first ten seconds of the trailer.
You can’t fight that. All you can do is adapt to it. You need to make those first few seconds compelling enough that people will want to watch the rest. This means that no, you can’t use the first fifteen seconds to show your cool company logo, or the fancy game logo, or waiting around staring at a black screen as the music swells. You’ve got to launch right into what’s exciting about your game instantly. I had music composed specifically for my game’s Greenlight trailer, and had to have its beginning totally redone, because it had a beautiful lead-in which was simply too long for use on Greenlight. I love that original opening, and I’m hoping to get to use it somewhere someday, but I needed to have those 2 seconds back. In Greenlight terms, 2 seconds is 20% of the time you can be pretty sure that absolutely everyone will see, and I simply can’t afford to give up that much of their attention when I’m trying to convince them to click on that little “yes” button.
You really, really want your trailer to be shot at 16:9, 1080p. If you can capture it at 60fps, that’s fantastic, but 30fps is okay. If your trailer is showing live game footage (it should be), be very careful that it doesn’t include any screen tearing, and that no frame rate drops are visible. If you need to borrow a faster computer in order to do that, do it! Nothing is worse for a trailer than for it to look like it doesn’t run at full speed on the developer’s own computer. (That six-second-long shot in my trailer? I spent the better part of a day capturing it; trying to set up for each attempt took several minutes, and I was flying the camera backward manually, using a controller to move the camera over uneven terrain. When I finally got a perfect take where I didn’t accidentally drift away from the subscribers or clip through a hill, I eventually discovered that I had a frame tear visible in one frame of the captured video, so I had to scrub it and shoot the whole thing again.)
Greenlight trailer editing 101:
- You want a total duration of 60 seconds or less. Bonus points if you can get beneath 50 seconds. Note that it takes a lot more effort to make a short trailer than a long one.
- No individual shots longer than 3 seconds.
When assembling the shots of your trailer, keep the following editing rules in mind:
- When transitioning from one shot to another, use a simple cut, unless you’re doing something special (detailed below).
- A fade to black indicates that the trailer is over; viewers will disengage. Feel free to use this at the end of your trailer, but at no other place. (caveat: horror games like to use lots of fades to black, often synchronised to a heartbeat or other tense audio effects. You can probably get away with that if it’s appropriate for your game’s genre. But for most games, fading to black at any point signals the end of the trailer, and you’ll start to lose viewers). Note that a hard cut to black does not necessarily indicate the end of the trailer, if it’s synchronised to a sudden audio element; it’s only the fade to black which does that.
- A particularly slow fade to black also indicates that the trailer is over, but additionally implies that whatever we’re looking at during the fade continues to happen forever. This might be appropriate and useful if you’re making a game from a genre that has the word “infinite” in its name. But otherwise, keep the end-of-trailer fade (if you do one at all) quick, or else you’re cinematically implying that your character is stuck in that single gun battle for all eternity.
- A fade up from black is fine, but uses up some of your precious time. Strongly recommend against using these, in general.
- A crossfade indicates that the two shots are actually coming from a single scene, separated in time. If you have a long scene that you can’t make fit into 3 seconds, you can often make it work by crossfading between different parts of the scene, with each “part” being about 3 seconds long. This lets you keep the Greenlight-appropriate pace, while staying in the same scene for longer! MT2 abuses this trick in its first three shots so that viewers will connect the sentence fragments in those first three shots into a single sentence; while those three shots are captured in different places in the game (and on different days!), they are functionally “the same scene” because of those words have to be assembled into a single sentence in the viewer’s mind, and so they get a crossfade so that the viewer intuitively knows to do that.
- In cinematic terms, a very fast fade is called a “dip”. A dip to white indicates that things are about to change. If you’ve opened with a couple long shots and are about to start doing 1-second or 2-second shots, put a dip to white where you switch tempo, and the audience won’t be surprised by the pacing change! (Witness the MT2 trailer, where we use a dip to white at 0:10 for exactly this purpose) My own experience has been that virtually every time I have wanted to fade to black in the middle of a trailer, it’s far better to instead dip to white!
- And of course, all the above rules may be disobeyed at any time for any reason; that’s completely fine! These rules are (as they say) really more like guidelines. Just be aware when you’re breaking one of these rules, be doing it for a reason that you understand, and it’s all good. :)
When uploading the video to YouTube, make sure that:
- The video’s name is “<Game Name> Greenlight Trailer”.
- The video’s description is set to say that the game is coming soon to Greenlight. Do not provide a link yet, since your Greenlight campaign isn’t live yet and such a link wouldn’t work for anyone but you! (My trailer leaked a few days in advance, and I had what looked like a broken link in the description; don’t let that happen to you!)
- The video is set as “unlisted”; you don’t want people to find the video yet!
- The video’s category is set to “Gaming”, with your game’s title filled into the Game Name box. (These options are under “Advanced settings” on the video).
Screenshots

This screenshot was accidentally taken in a 16:10 aspect ratio. Don’t do this!
In addition to the trailer, your Greenlight submission needs at least six screenshots. As with the trailer, these should be taken at a 16:9, 1080p resolution. Try not to show the same things that you showed in the trailer. Ideally, you want to show things here which didn’t get much screen time in the trailer, or which require looking at for longer, in order to appreciate.
In my case, in the final hours before launching my campaign, I realised that I had never taken a screenshot showing my game’s “Info” panel, showing personal details about individual subscribers. So I took a screenshot showing exactly that. And every one of the Tycoon/Simulation-focused publications which wrote about the game chose to use that specific screenshot for their articles, because that showed the sort of data that their readers most care about, and which I’d completely forgotten to present until the very last minute!
So it’s important to know who is going to be interested in your game, and why they’re going to be interested, and show them screenshots of the things that are going to make them buy in!
Also note that the arrangement of your screenshots matters. More people will see the leftmost screenshot than will see the next one to the right. Each successive image will be seen by fewer people than the previous one. So put your best screenshots all the way on the left! I intentionally put an evocative image first, and then a map image second; those were, to me, the most important ones. If I was doing this campaign again, I would have focused more on informational displays, and provided more screenshots of those, and put them earlier in the list!
Finally, be aware that people will look at the thumbnails of your full set of screenshots as a group, and so you want the collection to look attractive when viewed as a whole. In my case, my first batch of images were all dark, and so I needed to go back and get more pictures of brighter areas in the game, just to visually break up all the darker screenshots!
The branding image
In addition to the above, Valve asks for a square image to use to represent your game. They don’t tell you what resolution to use; they resize it to fit wherever they’re going to use it. I provided my image at 512×512 pixels. Probably the most important location where they will show this image is on the “Recent Greenlight Submissions” screen, where they’re displayed at 200×200 pixels, but they are displayed larger in other places, including (typically) at double that resolution on high-density displays.
 The current Greenlight meta is to use an animated gif for your branding image. I don’t know to what extent that helps; I didn’t use one, and got through just fine. What is important is that you want to stand out, compared against the other games which are released at about the same time as you; it’s from this screen that you’ll get most of your traffic during your first two days on Greenlight.
The best way to plan for this is to see how your branding image compares against other real branding images. Here’s an image I prepared while considering different branding images for my game, just compositing each branding image into a real screenshot of a Greenlight “recent submissions” page. You want to look at the colors and design of those other Greenlight submissions around your game; do you stand out from them? What can you do to improve things? Does your game’s branding image work as well in the middle, as on the side? Does it work against that dark blue-grey that Steam uses as their background color on this screen?
Animation is definitely one approach, but now that so many branding images are animated, I wonder to what extent that helps you stand out any more. In my case, I chose to go with solid, static graphic design, instead.
The description
For me, this was the most intimidating part of the Greenlight process. And it’s the one that I was tweaking right up until the last few minutes before launch. (And then tweaked once more even after being greenlit; somehow we went through the whole Greenlight process without anyone ever mentioning to me that I’d forgotten to close an ‘italic’ tag, right near the top of the description. D’oh!)
General structure: A one or two-sentence “sound bite”, followed by an “elevator pitch”, followed by any further information you want to add. Just be aware that half the people visiting your page won’t read your sound bite. And of those who do, half won’t read the elevator pitch. And of those who do, half won’t read the following paragraph. And so on. It’s worth getting this text right, but no matter what, it won’t have nearly the impact of your trailer. So don’t stress over it too badly. In mine, I had about four different “elevator pitches” at the start of my description, just one after another, sorted in terms of length. Works fine. Most games then provide a bullet-point list of features, and perhaps a FAQ, if you feel your game needs one. But again, most voters never read these; they’re mostly here just to make the page look professional, and to satisfy the more details-hungry viewers.
Be sure to send the text of your description to be proofread by a few people, ideally editors, technical writers, or marketers. Take their advice! Having other people read your description is a great way to find typos and other issues.
 The current Greenlight meta in the item description is about the importance of “image headers”. That is, using an image instead of [h1] tags around headings. (Yes, Steam predates the modern joys of Markdown, and you have to style your text using what is fundamentally BBcode.) I can’t say how important those image headers actually are, but I know that my game’s description became more pleasant to look at and read once it had been broken up a little, with short, wide image banners between sections. For the headers, I used precisely the same text header color that Steam uses by default for [h1]-tagged headers, but used images of a text in a different font, and a larger print size, just to make them stand out more. (I found that doing the headers in solid-color text was less distracting and easier to read than doing something fancier). Note that Steam does not host images in your submission’s description field; you’ll need to host them elsewhere. I used Amazon S3 + Cloudfront, but regular free image hosting would presumably work just as well.
If you’re trying to color-match the Steam background for some reason (for example, if you don’t want your images to appear rectangular), then be aware that you’ll need to strip the color profile information from your images, or else web browsers will try to gamma-correct them, and they’ll end up looking different than the steam page. I found that it’s much easier to just use an alpha channel in your images than to work out how to strip out the color profile from saved images. (The game logo at the bottom of my description area used the first approach, but I’d learned my lesson by the time I made the image headers; those all use alpha channels.)
Preparing social media
There are, in my mind, three key social media channels that you want to cover.
- Facebook. Have a facebook page for your game, and probably for your studio.
- Twitter. Have a presence on Twitter for yourself personally, and/or for your studio.
- Reddit. If you have time to build up a reputation on Reddit, it’s worth doing so. I had been a longtime user of /r/gamedev. The important point on Reddit is that while there are a lot of viewers there, most of the site has very strong anti-self-promotion rules, which look at what percentage of your contributions have been promoting your own content. So if you come to Reddit immediately before releasing something, you’re likely to be banned for advertising it. Instead, come early and participate in other things, so when you mention that you’ve been doing something cool, it doesn’t look like you’ve just shown up to spam people. I recommend starting at /r/gamedev, or perhaps /r/indiegames, or other (relatively) small subreddits, rather than trying to engage with the broader Reddit channels, which can often be more hostile.
Web
You should have a website for the game, and for the studio. It doesn’t have to be a devblog like this site, but it needs to be a stable address that you can send people to. I didn’t use this site at all during my Greenlight campaign; I instead pointed people to the game’s teaser site, which in turn pointed people to Steam, and to the game’s mailing list.
You also want to create a press kit, perhaps using DoPressKit. (I found I had to hack into its PHP, to make mine work nicely, but even as somebody who doesn’t know how to code in PHP, it was still a huge time-saver over implementing a press kit from scratch!)
Finally, I found it was useful to also create a bare-bones “Super Secret” webpage to contain information that I could keep updated as the campaign continued. The idea was that supporters could always go there to get the latest information, and links to social media things that they could share. This seemed like a really good idea, but the game was greenlit quickly enough that I didn’t really get to do much with it. But somebody else might like to copy this idea, so I thought I’d mention it!
You should have a mailing list for your game, which people can sign up to. Ideally, you want this list to be available for at least a few months before you start your Greenlight campaign. You should point people to this mailing list from your web sites. For me, I handled this through MailChimp, which worked okay for me, but there are plenty of alternatives. The general idea is that people will discover your game based upon your postings to social media. From there, they’ll go to your web site. And from there, some will sign themselves up to your mailing list.
Over a couple months, I had about 150 people sign themselves up for my mailing list. I did not send a single mail to that list until it was time to launch the Greenlight campaign.
Additionally, create a list of everyone you know, and their email addresses. Family, friends, acquaintances, ex-workmates, etc. People who like you. You want as many people in this list as possible. (In my case, I had about 80, and I should have had more, but I left this step until far too late, and forgot a lot of people whom I should have remembered).
Pre-launch: Two Days Before Launch
Okay, you’re all set! You’ve got everything complete and ready to go, and it’s about 48 hours from launch. This is where things get real very quickly.
Step 1: The warm-up email
This is a matter of respect; people freely gave you their email addresses, so you should always send things to them first, before posting the announcements to social media or anywhere else.
So, two days before launch, you send an e-mail to everyone on your “friends/family/acquaintances” list and your regular mailing list, letting them know that your game is finally going to be going up on Greenlight. Give them the date and approximate time at which it will happen, and let them know that you’ll send them another email once it’s actually live. Ask them to be ready to retweet you on Twitter and/or like a post about the game which you’ll post to Facebook, and thank them for their support; let them know how important they are both to you, and to the success of the game’s Greenlight campaign! Include one or two screenshots (it’s okay to use ones from your Greenlight page itself), and a “sneak peak” link to the game’s trailer, but ask them not to share those yet; to wait until launch day!
Personally, I refuse to add anybody else’s email address to mailing list software, so I wrote individual emails to everyone on my friend/family/acquaintances list, and sent them from my normal, personal email address. Everyone who signed themselves up on MailChimp received a single mail through that. If you’re going to do this the same way that I did, be aware that it takes a long time to write 80 emails! It took me much of the day just to work my way through that email list, writing personal notes to everyone! In retrospect, I should have written those emails the day before, and saved them as “drafts”. Would have saved a lot of time on a very busy day!
Step 2: Post to Social Media
After sending those emails, post a tweet to Twitter stating that a big announcement is coming in two days. Your followers probably know what you’re talking about without you telling them, and you don’t want the news to be picked up yet; you just want your followers who didn’t sign up for the email newsletter to realise that it’s coming.

Similarly, post something to your game’s Facebook page stating approximately the same thing. Don’t go into too much detail here; again, the idea is just to raise awareness among the fans you already have, that soon you’re going to be asking them to spread the word.
You can also post to your blog, or other channels, but the above are the important two!
Step 3: Breathe
I only mention this step because it’s easy to forget in all the last-minute hustle and bustle!
Launch day
Step 1: Publish
Okay, here we go! Your first task for the day is to choose precisely when to publish your Greenlight page. You already know approximately the time you want to go, but first visit Steam Greenlight’s Recent Submissions page. Watch the games at the top of the list; refresh the page every few minutes. When you see a set of submissions that you think your branding image looks good when compared against, go publish your page! (Of course, you can’t control what games come after you, but you can at least try not to publish immediately after something with a branding image that looks more attractive than yours!)
Step 2: Update the trailer page
Okay, it’s time to go back to our trailer’s page on YouTube and insert the link to the Greenlight campaign in its description. Additionally, set it as “public”. Also, make sure that commenting and rating are enabled (unless you have a reason for disabling them)
Step 3: Tweet
Post your campaign announcement to Twitter! Be sure to include an image, or a video! I prefer video, but Twitter is pretty fussy about precisely what format of videos it will accept. Probably worth doing a little advance preparation to make sure you can make something Twitter will accept!
First thing, you’re going to ask for retweets:
Hi everyone! Would appreciate retweets of the next tweet… here we go! :)
— Trevor Powell (@vectorstorm) May 11, 2016
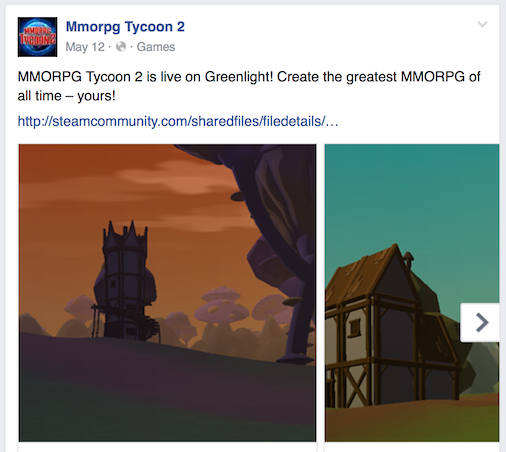
And then post the announcement tweet itself:
MMORPG Tycoon 2 is live on Greenlight! Create the greatest MMORPG of all time – yours! https://t.co/RPPLg4TgYt pic.twitter.com/0QL8PoFv8f
— Trevor Powell (@vectorstorm) May 11, 2016
In any case, once you’ve tweeted, pin the tweet to your profile so that anyone who looks at your profile will see it. Finally, make a note of the permalink to the tweet; we’ll need that soon!
(It’s interesting to note how relatively few retweets that tweet got; my later ones which announced
Step 4: Post to Facebook
Post the campaign announcement to the game’s Facebook page! Personally, I like to go short and sweet; don’t distract too much from the core logline, but be sure you do include some images! At the time that I did this, Facebook seems to pick up any images that you’ve embedded into your game’s description, but doesn’t pick up screenshots. So you might want to add some of those, if your description is light on images!
Share that post to your timeline, to any relevant groups you’re part of, etc. For me, I found that I got my best response from the Indie Game Promo group, but let other folks know as well!
Step 5: Email
Normally, you would send these emails first. However in this specific instance, you need these emails to include links to the Tweet and Facebook post you just created, so you can’t send the emails until afterward!
For this set of emails, I once again manually sent emails to all of my personal contacts. However, I had learned my lesson from the last time; I created mail drafts a day in advance, so all I had to do was to paste in links to the Tweet and the Facebook post, and mail them out. Once again, the idea was to let people know that everything was live, and to ask them for their help in spreading the word to anyone they knew who might be interested! As a result, instead of taking all day, I managed to send all my emails in just about 20 minutes.
Step 6: Try not to obsess over your game’s statistics page too much.
When I started my Greenlight, I said that I wouldn’t be one of those people that stares at the stats page, mashing F5.
— Trevor Powell (@vectorstorm) May 14, 2016
(But forgive yourself, when you do)
Step 7: Contacting journalists
Actually, I don’t know that this is effective or useful. I sent mails to about a dozen journalists, but didn’t have anyone bite. A number of websites wrote about the game, but they all discovered the game organically, not because I’d contacted them.
As a general rule, most mainstream games don’t consider something launching on Greenlight to be newsworthy. My feeling is that you’re probably better off not contacting folks at all, or focusing on something other than the Greenlight campaign, if you do. Big media coverage is unlikely until you’ve been greenlit!
Post-launch
Once your campaign has gone live, you basically have just one job: keep it alive.
You’ll be receiving comments on your game’s discussion page on Steam. You’ll be receiving comments on your various posts to Facebook, and to your Twitter account(s). You’ll likely be receiving email responses from the people you sent mails to. Respond to anyone who has questions, thank people who have nice things to say, and also thank people who have criticisms! (And don’t respond to people who are trolling). If you need to take time off in order to react calmly, absolutely do that! An unconsidered word can do a lot more damage than a delayed response!
You’ll also probably start receiving messages from streamers and “publishers”, eager to work with you. For media folks, I told them about the game’s current state, and advised them about when I’d start thinking about media copies. “Publishers” received no response at all.
During this period, I found I was unable to watch most television/movies, partly due to feeling like I needed to go back and check on the campaign every few minutes, and partly because they were just too stressful, on top of what was already a stressful period. You probably won’t have that specific reaction, but try to recognise how you’re dealing with the demands of managing the campaign, and take care of yourself as best you can! And trust your closest friends if they tell you that you’re not coping well; when you’re in this sort of situation, the stress affects your self-assessment; folks outside of you probably have a much clearer picture than you do about how well you’re coping!
In any case, you should post an announcement once every few days. The goal of doing this is just to show that the campaign is active, and that you’re still there, engaging with people. It doesn’t really matter what the announcement is, as long as you make one every two to three days. These can be announcements about adding new features to the game, or new artwork or videos that haven’t been shown before, or even just announcing progress in the voting (typically people announce reaching the top 100, the top 50, the top 25, and the top 10). These announcements should always be posted to your Greenlight page, and often to Twitter and/or Facebook as well. Note that your ranking can go down, as well as up, but you don’t want to announce the downward movements; only announce reaching these points the first time you reach them!
Two days after launch
Here’s a little piece of magic:
The reminder mail
Two days after launch, send another email to your email lists, and give people an update on how the campaign has been going.
If you have had an exciting launch (it’s entirely possible to be well into the top 100 by this point), then tell them about that. If not, then use whatever you’re using for one of your recent announcements on your Greenlight page. So this email is going to lead with some piece of exciting news. In my case, it was that we had broken into the top 100, and were currently ranked at #68, after just 48 hours.
While we’re sending this email to tell everyone our announcement, its most important function is to be a reminder that your project exists; all those people who put off voting and forgot about it now get another reminder! And we’ve told them that we’re already doing well, so they’re backing a winner! For my game, we got a much bigger traffic surge from this reminder email than from the original “we’ve gone live” mail; it is absolutely worth sending!
In this mail, be sure to ask again for people to vote, to share the news, and to retweet/like your social media messages. Remember to provide those links in the email again, so recipients don’t have to go searching for them! You want to make it as easy as possible for them to help you.
The Greenlight doldrums
Be aware: by about two days after launch, you’ll typically have dropped off the first screen of “Recent Greenlight Submissions”, and so you’ll stop receiving nearly as many new viewers from within Steam. As a result, if your viewers were mostly coming from Steam pushing people to you, you might see a big drop-off in your number of viewers. From here out, you’ll need to be pulling in viewers from external sources. So keep active!
The Greenlight cycle
In general, games are greenlit as part of regular batches. These batches are currently spaced approximately two weeks apart, and typically contain anywhere from 100 to 150 games, although batches as large has 500 games have been witnessed. Sometimes individual games get greenlit between batches; these are often games which fill some niche in Steam’s store. Recently, these have often been finished F2P games which are already available through another storefront, or finished VR experiences. Don’t worry too much about them; your game will almost assuredly go through in one of the batches.
Top-rated games are not always greenlit
It’s important to understand that having a high rating isn’t a guarantee that your game will be greenlit. My game was at #22 when it was greenlit, but nearly half of the games rated higher than mine were not approved in the batch that approved mine. A high rating is not enough, by itself!
Low-rated games often get greenlit
It’s also important to understand that the majority of greenlit games are typically not in the top 100 at all. I’ve spoken with many developers whose games have been greenlit when less than 50% of the way to the top 100. As of the time of writing, it seems that if your game has at least 400 ‘yes’ votes, then you’re in an area where Valve will be at least considering your game for being greenlit; it may take a few batches, but you should eventually be included.
Greenlight games are selected manually
The above factors make it quite clear that there is a human factor in the selection of games to approve. While the community voting can bring a game to Valve’s attention, it is neither sufficient nor necessary in order to have your game be approved. There are dozens of stories about people who have had a high-profile Reddit post, or were showing their game at an expo somewhere, and their game was mysteriously greenlit hours after the expo opens. If someone at Valve notices your game and likes it, that’s often all it takes. So keep the faith, and keep promoting!
Conclusion
Wow, it took me a lot longer to type that up than I’d expected!
Getting through Greenlight isn’t the huge struggle that it used to be. But if you want a smooth trip through the process, you want a short and snappy trailer, compelilng screenshots, and a strong marketing strategy to get your game in front of people.
If you have questions, or if you have different opinions, I’d love to hear them! Drop a comment below, or send me an email. Would love to hear from you!